Tag: Dynamics CRM

Canvas-Apps for Approvals in Dynamics 365-CE

There are scenarios where we need to configure approvals in Dynamics 365, for example, mark an account as a premium customer after approval or qualify leads after approval etc. We used dialog control to capture approval request and comments but, now dialog controls are depreciated and not advised for use in new projects.

As per Microsoft’s initial announcement

Dialogs are deprecated and are replaced by mobile task flows (available as of the December 2016 update), and business process flows. Both task flows and business process flows will continue to evolve to make the transition easier.

But either tasks flow or business process flow was not a perfect replacement for Dialog. Knowing this pain from users, Microsoft has now modified the announcement.

Dialogs are deprecated, and should be replaced by business process flows or canvas apps

Even though I knew canvas apps can be now embedded in model-driven apps, I hadn’t thought of this option until I came across this new announcement, so tried replicating my approval dialogs with a canvas app and it works fine. Pheww!!!! 🙂

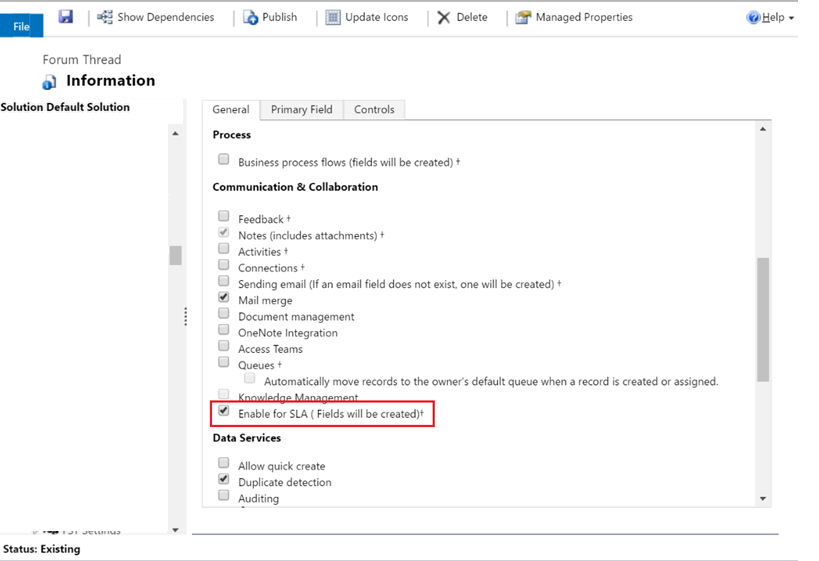
For testing purpose I replicated the dialog for creating approval request for Account entity.

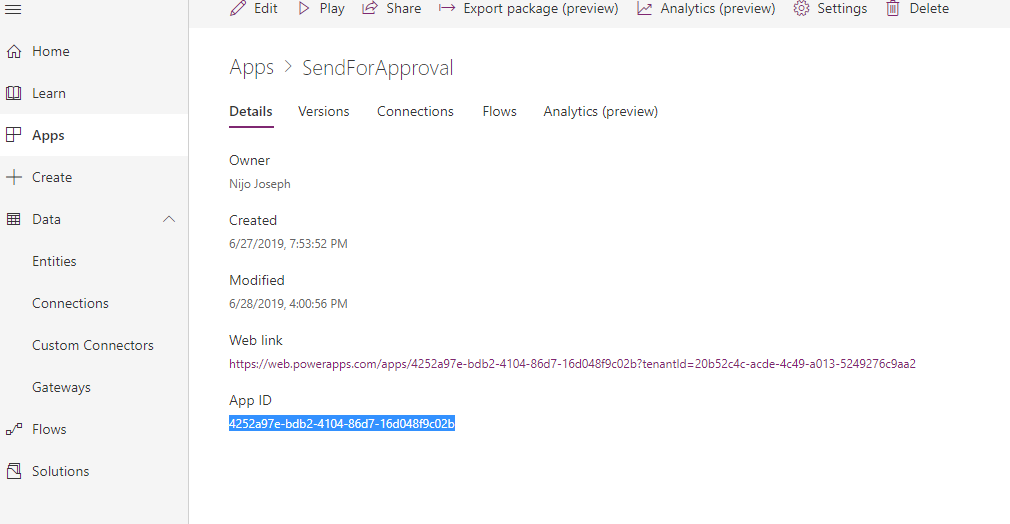
  1. created a canvas app to create approval request.
This sample app changes account status to pending verification and captures the comments in one custom field.

2. Now we need to call this app from account form, obtain the app ID from app details section.

select app details to get the App GUID

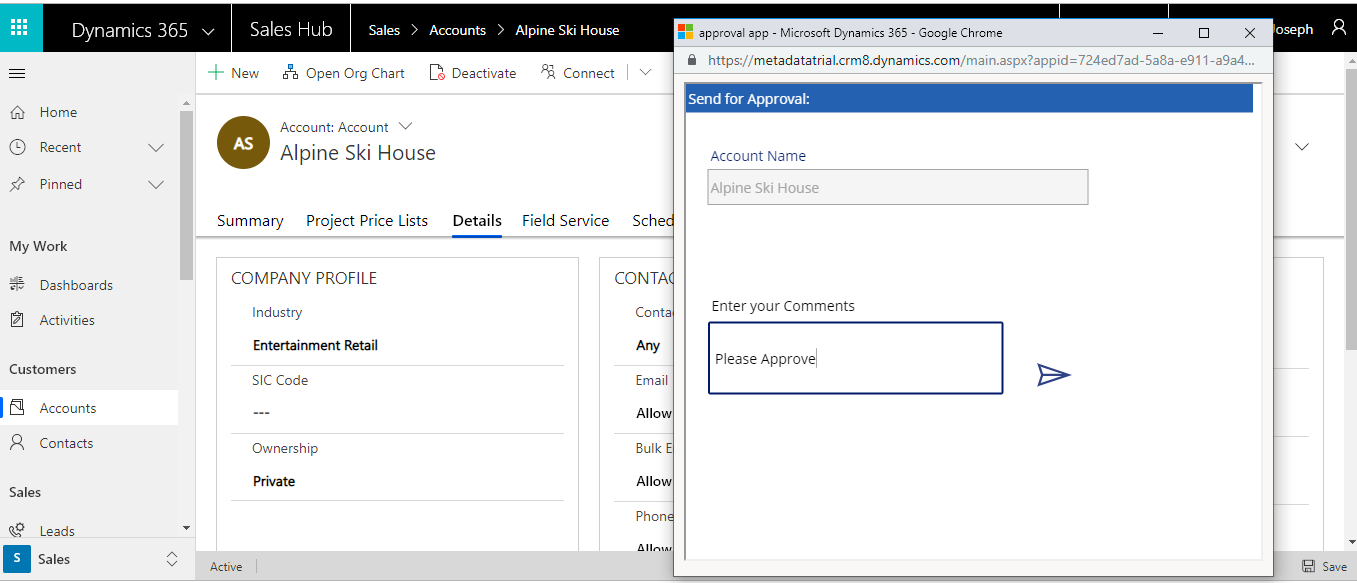
3. I need to call this canvas app as a popup when user clicks a button. I created a custom button for account entity-> added a JavaScript as button action to call an HTML web-resource and embedded my canvas app in this html I-frame.

<html><head>
<title>Approval</title>

<meta http-equiv="content-type" content="text/html; charset=UTF-8">
</head>
<body style="padding: 0px; font-family: arial; overflow-wrap: break-word;" onload="LoadPowerApp()">
<center>


<iframe id="Approval" width="800" height="600"></iframe>


</center>
<script id="myScript">
function LoadPowerApp()
{
var AccountID = window.parent.opener.Xrm.Page.data.entity.getId().slice(1, -1);
var url ="https://web.powerapps.com/webplayer/iframeapp?source=iframe&appId=/providers/Microsoft.PowerApps/apps/56123673-f45c-4b96-b9e6-ece1b0a8069a&ID="+AccountID;
document.getElementById("Approval").src=url;
}
</script>


</body>
</html>

I know you have many questions now. "https://web.powerapps.com/webplayer/iframeapp?source=iframe&appId=/providers/Microsoft.PowerApps/apps/56123673-f45c-4b96-b9e6-ece1b0a8069a&ID="+AccountID;

This is the key and I will breakdown it into parts “https://web.powerapps.com/webplayer/iframeapp?source=iframe&appId=/providers/Microsoft.PowerApps/apps/APP GUID&CUSTOM PARAMETER NAME=”+PARAMETER VALUE

App GUID I explained in step 2, now regarding custom parameter, I deliberately didn’t mention it when we discussed the app creation and kept for this section. When we open this canvas from an account form(like we start a dialogue) the app needs the record GUID to update the account status

I have used form control in the canvas app and filtered the item using the ID Parameter.

4. Now try your button and you can see the magic.

You can download the sample APP from TDG Power Apps bank.

Please note this is a basic app I tried for testing purpose and needs many improvements to use in a live project. you are always welcome to discuss with on this app.

Hope this helps….. 🙂

Microsoft Dynamics CRM is behaving weird!!! (Common troubleshooting tips)

Sometimes your on-premise CRM system will show, some weird behaviors like workflows are not executing / plugins are not working / data imports are failing without any data issues etc…

I have faced certain issues like the entire system is not working , system will  show error messages without any logs, the only message it  displays is “an error has occurred”.

Following are the common issues you can check in such situations.

Ensure CRM Asynchronous services are running

From the server Administrative Tools select Services, and if the CRM Asynchronous services are not running ensure to start the services (if the Asynchronous  services are not running CRM will stop working).

Ensure CRM Sandbox services are running

From the server Administrative Tools select Services, and if the CRM Sandbox services are not running ,please start the services. If the Sandbox services are not running CRM will stop working or the normal system jobs will fail without showing any valid errors .

Check IIS

Ensure the following in IIS

CRM application pool and CRM  website are up. Try browsing the CRM website from IIS.

Make sure your SQL server and Reporting services are up

Ensure your local machine time is in sync with the server time 

This may sound funny but trust me this simple point can save your many productive hours.

Recently my system failed to  perform certain operations and I wasn’t able to connect the Xrm tools too. When I debugged I got the keyword “past time” , then I identified that the server time was different from my local machine.

If you have tried all the above steps and still you are not able to identify the issue,please check the server event viewer this may give you some details regarding the failure.

Hope this helps!!!…  🙂


On demand backups for CRM Online instance

With on demand backups, you can make your own backup before making some significant customization change or applying a version update.

CRM Online Administrator Center

About CRM managed on demand backups:

  • You can back up Production and Sandbox instances.
  • You can only restore to a Sandbox instance. To restore to a Production instance, first switch it to a Sandbox instance. See Switch an instance.
  • Only CRM Online 2016 Update 1 or later versions are supported for backup.
  • On demand backups are retained for up to three days. Check your expiration date.
  • On demand backups are identified as created by someone other than System and by the presence of Edit | Delete | Restore in the details section. System backups only have Restore.

Backup and restore CRM online instance

Configure SLA for Custom Entities

In previous releases, you could create SLAs only for case records. With CRM Online 2016 Update 1 and CRM 2016 SP1, you can now create enhanced SLAs for entities that are enabled for SLA. A system administrator or customizer can enable SLAs for the following entities and also for custom entities and custom activities:

  • Account
  • Contact
  • Order
  • Invoice
  • Quote
  • Opportunity
  • Lead
  • All activity entities like email, phone, and appointment except recurring appointment and its instances.


To enable SLA for custom entities you can select Enable for SLA option in the entity.

Untitled

once the entity is published you can configure SLA using the same steps we used for case, system will ask for the related entity at the time of SLA creation  .

Untitled

Please note that only enhanced SLA is available for custom entities , standard SLA can be used only with case entity.

To create see how to configure SLA please follow the link :Define SLA

To add a timer control to the form please follow : Add Timer

Hope this was helpful……..


WEB API- Part 5 : Get lookup text

Get lookup text using WEB API

Following code will fetch the originating lead lookup text and Id from an opportunity .

var req = new XMLHttpRequest();
req.open("GET", Xrm.Page.context.getClientUrl() + "/api/data/v8.0/opportunities?$select=_originatingleadid_value&$filter=_originatingleadid_value ne null", true);
req.setRequestHeader("OData-MaxVersion", "4.0");
req.setRequestHeader("OData-Version", "4.0");
req.setRequestHeader("Accept", "application/json");
req.setRequestHeader("Content-Type", "application/json; charset=utf-8");
req.setRequestHeader("Prefer", "odata.include-annotations=\"OData.Community.Display.V1.FormattedValue\"");
req.onreadystatechange = function () {
    if (this.readyState === 4) {
        req.onreadystatechange = null;
        if (this.status === 200) {
            var results = JSON.parse(this.response);
            for (var i = 0; i < results.value.length; i++) {
                 var _originatingleadid_value = results.value[i]["_originatingleadid_value"];// Id
                 var _originatingleadid_value_formatted = results.value[i]["_originatingleadid_value@OData.Community.Display.V1.FormattedValue"];// text value
            }
        }
        else {
            alert(this.statusText);
        }
    }
};
req.send();

WEB API- Part 4 : Get option-set text

Get option-set text and value using Web API

Following code fetches lead source option-set value and text from lead entity.

var req = new XMLHttpRequest();
req.open("GET", Xrm.Page.context.getClientUrl() + "/api/data/v8.0/leads?$select=firstname,leadsourcecode&$filter=fullname eq 'Alex%20Eric'", true);
req.setRequestHeader("OData-MaxVersion", "4.0");
req.setRequestHeader("OData-Version", "4.0");
req.setRequestHeader("Accept", "application/json");
req.setRequestHeader("Content-Type", "application/json; charset=utf-8");
req.setRequestHeader("Prefer", "odata.include-annotations=\"OData.Community.Display.V1.FormattedValue\"");
req.onreadystatechange = function () {
    if (this.readyState === 4) {
        req.onreadystatechange = null;
        if (this.status === 200) {
            var results = JSON.parse(this.response);
            for (var i = 0; i < results.value.length; i++) {
                 var firstname = results.value[i]["firstname"];
                 var leadsourcecode = results.value[i]["leadsourcecode"];
                 var leadsourcecode_formatted = results.value[i]["leadsourcecode@OData.Community.Display.V1.FormattedValue"];
            }
        }
        else {
            alert(this.statusText);
        }
    }
};
req.send();

Please note the following code

" var leadsourcecode_formatted = results.value[i]["leadsourcecode@OData.Community.Display.V1.FormattedValue"];"

“fields name@OData.Community.Display.V1.FormattedValue” will give you the text value of the filed.

Note : Don’t forget to add req.setRequestHeader(“Prefer”, “odata.include-annotations=\”OData.Community.Display.V1.FormattedValue\””);
in the request header

WEB API- Part 3 : Retrieve records modified within last few hours

Using Query Functions:  Retrieve records modified within last few hours 

Query Functions  are intended to be used to compose a query. These functions can be used in a manner similar to the standard library functions,

The following example shows how to use the “LastXHours” to return all account entities modified in the past 12 hours.

var req = new XMLHttpRequest();
req.open("GET", Xrm.Page.context.getClientUrl() +/api/data/v8.1/accounts?$select=name,accountnumber&$filter=Microsoft.Dynamics.CRM.LastXHours(PropertyName=@p1,PropertyValue=@p2)&@p1='modifiedon'&@p2=12

For complete list of query functions please follow the link Query functions.


WEB API- Part 2: Retrieve Single Record Using WEB API

Retrieve Single Record Using WEB API

Following  code shows how to fetch an account record using  Guid

var req = new XMLHttpRequest();

var AcccountID="257bAC5D5240-8B31-E611-80E4-5065F38B4681";
req.open("GET", Xrm.Page.context.getClientUrl() +"/api/data/v8.0/accounts(AcccountID)?$select=name", true);
req.setRequestHeader("OData-MaxVersion", "4.0");
req.setRequestHeader("OData-Version", "4.0");
req.setRequestHeader("Accept", "application/json");
req.setRequestHeader("Content-Type", "application/json; charset=utf-8");
req.setRequestHeader("Prefer", "odata.include-annotations=\"OData.Community.Display.V1.FormattedValue\"");
req.onreadystatechange = function () {
if (this.readyState === 4) {
req.onreadystatechange = null;
if (this.status === 200) {
var result = JSON.parse(this.response);
var name = result["name"];
}
else {
alert(this.statusText);
}
}
};
req.send();

Let’s Play with WEB API – Part -1 : Retrieve Multiple Records

Retrieve Multiple  Records using Web API

The Web API is a newly introduced open standard endpoint currently available in CRM 2016  at [organization uri]/api/data/v8.0/ which implements ODATA v4 and allows you the full blown functionality that you would typically experience when interacting through the CRM Organisation Service.

The Web API service is said to eventually replace the existing Organisation and Organisation Data service and MS recommend that if you writing new code that you begin using the Web API endpoint as the existing ODATA REST endpoint is officially deprecated but still available for backward compatibility.

The new API has introduced some impressive functionality that was not available to us previously with the existing ODATA service. Some of that functionality includes:

  • Ability to execute saved queries
  • Ability to execute FetchXML
  • Use Queries Up to Second Level

Following code shows how to retrieve records using web API, I have tested to retrieve 2000+ records and it is working fine.

This code alerts the number of contacts under an Account entity.

function AccountOnLoad()

{

    var Id = Xrm.Page.data.entity.getId().substring(1, 37);

    var entity = "contacts";

 var columnSet = "?$select=firstname&$filter=_accountid_value eq " + Id + "&$count=true";

    var options = columnSet;


    var serverURL = Xrm.Page.context.getClientUrl();

    var Query = entity + options;

    var req = new XMLHttpRequest();

    req.open("GET", serverURL + "/api/data/v8.0/" + Query, true);

    req.setRequestHeader("Accept", "application/json");

    req.setRequestHeader("Content-Type", "application/json; charset=utf-8");

    req.setRequestHeader("OData-MaxVersion", "4.0");

    req.setRequestHeader("OData-Version", "4.0");

    req.onreadystatechange = function () {

        if (this.readyState == 4 /* complete */) {

            req.onreadystatechange = null;

            if (this.status == 200) {

                var data = JSON.parse(this.response);

                if (data['@odata.count'] != null)

                    alert("This Account Has" + data['@odata.count'] + "Contacts");

            } else {

                var error = JSON.parse(this.response).error;

                alert(error.message);

            }

        }

    };

    req.send();

}


There are many other features too which I will be demonstrating in the upcoming posts.


Field Conflicts

Recently I faced a strange issue, I used a filed (lookup) twice in the form and applied a pre-filtering java-script to the field. But only one filed is getting filtered by the script.I tried many options and I couldn’t identify the issue. Have you even faced  this issue ? Finally I got the answer from  Scott Durow ( Thank you Scott!!! ). I decided to post this issue because if someone is facing the same issue , this will help them to solve the issue. Following is the explanation for this issue.

The issue you are experiencing is because the ‘getControl’ method returns only the first control – so in fact you are only adding the custom filter to the first control.

An attribute object has a ‘controls’ collection that can give you all the controls for a specific attribute. So you can add the filter to all the controls by using something like:

Xrm.Page.getAttribute(“fieldname”).controls.forEach(

function (control, i) {

control.addPreSearch(filterCustomerAccounts);

var customerAccountFilter = “<filter type=’and’><condition attribute=’accountcategorycode’ operator=’eq’ value=’1’/></filter>”;

control.addCustomFilter(customerAccountFilter, “account”);

}

);

Hope this helps!!!

Nijo