
Knowing the limitations of each UI will help you to save some precious time .
Giving back to the community what I have learned
Tag: Dynamics CRM
Knowing the limitations of each UI will help you to save some precious time .

If you are using email tracking and your system has records that share the same email address then, emails will be tracked to all records that uses the same email. You need to consider this when designing your solution…

Although you can define multiple quick create forms, only one quick create form can be used by everyone. The form everyone will use is set using the form order. Quick create forms cannot be assigned to security roles and they do not provide the capability for the user to switch forms.

It totally depends on your plugin style: In case for early-bound, I like using LINQ because it’s strongly typed and It helps development speed. Certain benchmark test have proved that Fetchxml is slightly faster than QueryExpression.
As per Microsoft official docs, there is no visible performance difference but just a personal preference of the developer.

In the previous post, we saw how to authenticate Dynamics 365 in Azure Functions runtime version 3 (.NET Core). Now let’s see how to use Dynamics 365 WEB API after acquiring the bearer token.
The following sample code accepts email as input in the request body, and uses Web api to return the contacts records with the passed email.
using System;
using System.IO;
using System.Threading.Tasks;
using Microsoft.AspNetCore.Mvc;
using Microsoft.Azure.WebJobs;
using Microsoft.Azure.WebJobs.Extensions.Http;
using Microsoft.AspNetCore.Http;
using Microsoft.Extensions.Logging;
using Newtonsoft.Json;
using System.Net.Http;
using Microsoft.IdentityModel.Clients.ActiveDirectory;
using System.Net;
using System.Net.Http.Headers;

namespace SampleFunctionApp
{


    public static class D365
    {
        [FunctionName("ConnecttoD365")]
        public static async Task<IActionResult> Run(
            [HttpTrigger(AuthorizationLevel.Function, "get", "post", Route = null)] HttpRequest req,
            ILogger log)
        {
            log.LogInformation("C# HTTP trigger function processed a request.");

            string contactEmail = req.Query["email"];
            string responseMessage = string.Empty;
            string requestBody = await new StreamReader(req.Body).ReadToEndAsync();
            dynamic data = JsonConvert.DeserializeObject(requestBody);
            contactEmail = contactEmail ?? data?.email;
            #region Auth Code
            //
            string cloud = "https://login.microsoftonline.com";

            //This is the Domain!

            string tenantId = "*******";

            string authority = $"{cloud}/{tenantId}";

            // ApplicationID in the new UI

            string clientId = "************";

            //Created from scratch in Keys

            string clientsecret = "*************";

            ClientCredential clientcred = new ClientCredential(clientId, clientsecret);

            // Application ID of the Resource (could also be the Resource URI)

            string resource = "https://*****.crm.dynamics.com/";

            AuthenticationContext ac = new AuthenticationContext(authority);
            AuthenticationResult result = null;
            var bearerToken = string.Empty;
            string ErrorMessege = string.Empty;
            try

            {
                //already having token
                result = await ac.AcquireTokenSilentAsync(resource, clientId);
                if (result != null)
                {
                    bearerToken = result.AccessToken;
                    log.LogInformation("Token Acquired:" );
                }
            }

            catch (AdalException adalException)

            {//Acquire token
                if (adalException.ErrorCode == AdalError.FailedToAcquireTokenSilently

                || adalException.ErrorCode == AdalError.InteractionRequired)

                {

                    result = await ac.AcquireTokenAsync(resource, clientcred);
                    if (result != null)
                    {
                        bearerToken = result.AccessToken;
                        log.LogInformation("Token Acquired");

                    }
                }
                else
                {
                    log.LogWarning("Failed to acquire Bearer Token :-" + adalException.Message);
                    var AdalException = new { adalexception = "Failed to acquire Bearer Token :-" + adalException.Message };
                    return new BadRequestObjectResult(JsonConvert.SerializeObject(AdalException));
                    throw adalException;

                }

            }

            #endregion

            #region getContact


            string outputString = string.Empty;
            //Next use a HttpClient object to connect to specified CRM Web service.
            var httpClient = new HttpClient();
            //Define the Web API base address, the max period of execute time, the
            // default OData version, and the default response payload format.
            httpClient.BaseAddress = new Uri("https://*********.crm.dynamics.com/api/data/v9.1/");
            httpClient.Timeout = new TimeSpan(0, 2, 0);
            httpClient.DefaultRequestHeaders.Add("OData-MaxVersion", "4.0");
            httpClient.DefaultRequestHeaders.Add("OData-Version", "4.0");
            httpClient.DefaultRequestHeaders.Add("Prefer", "odata.include-annotations=\"*\"");
            httpClient.DefaultRequestHeaders.Accept.Add(new MediaTypeWithQualityHeaderValue("application/json"));
            httpClient.DefaultRequestHeaders.Authorization = new AuthenticationHeaderValue("Bearer", (bearerToken));

            //Query to retrieve contacts
            var queryOptions = "contacts?$select=fullname,mobilephone&$filter=emailaddress1 eq '" + contactEmail + "'";
            HttpResponseMessage retrieveResponse1 = httpClient.GetAsync(queryOptions).Result;


            if (retrieveResponse1.StatusCode == HttpStatusCode.OK)
            {


                    responseMessage = retrieveResponse1.Content.ReadAsStringAsync().Result.ToString();


            }
            else
            {

                return new BadRequestObjectResult(JsonConvert.SerializeObject("an error occured while retriving contacts"));
            }


            #endregion

            if (string.IsNullOrEmpty(contactEmail) && responseMessage== String.Empty)
            {
                responseMessage = "Pass an email in the query string or in the request body";
            }

            return new OkObjectResult(responseMessage);
        }
    }
}
Test your function from post man.


Please note, the response in the code is not well formatted, you may format the response as a proper json object based on your business need.
Hope this helps.
I consider Azure functions as a powerful weapon in the armory in numerous scenarios, but not limited to the following:
Read more about Azure Functions here.
One challenge we face when creating a new azure function with Dynamics 365 is that the current runtime version which is 3, it uses .Net core(runtime version 2 also). It was much easier with version 1 as it uses the .Net framework and we can directly use D365 SDK for authentication and consuming 365 services. The power apps .Net core SDK is still under the alpha version and cannot be utilized for production purposes. One easy option here is to use ADAL and WEB API. In this post, let’s see how we can authenticate an application user in Azure functions V3.
Before we start, if you are not familiar with the following, please have a glance at the links provided,
Create your Azure function with the help of links added in point 3, and add following NuGet packages if they are not there in your function app.

Now use the following code to authenticate your Dynamics 365 application user.
using System;
using System.IO;
using System.Threading.Tasks;
using Microsoft.AspNetCore.Mvc;
using Microsoft.Azure.WebJobs;
using Microsoft.Azure.WebJobs.Extensions.Http;
using Microsoft.AspNetCore.Http;
using Microsoft.Extensions.Logging;
using Newtonsoft.Json;
using System.Net.Http;
using Microsoft.IdentityModel.Clients.ActiveDirectory;

namespace SampleFunctionApp
{
    public static class D365
    {
        [FunctionName("ConnecttoD365")]
        public static async Task<IActionResult> Run(
            [HttpTrigger(AuthorizationLevel.Function, "get", "post", Route = null)] HttpRequest req,
            ILogger log)
        {
            log.LogInformation("C# HTTP trigger function processed a request.");

            string name = req.Query["name"];

            string requestBody = await new StreamReader(req.Body).ReadToEndAsync();
            dynamic data = JsonConvert.DeserializeObject(requestBody);
            name = name ?? data?.name;
            #region Auth Code
            //
            string cloud = "https://login.microsoftonline.com";

            //This is the Domain!

            string tenantId = "**********";

            string authority = $"{cloud}/{tenantId}";

            // ApplicationID in the new UI

            string clientId = "*********";

            //Azure App secret Key

            string clientsecret = "******";

            ClientCredential clientcred = new ClientCredential(clientId, clientsecret);

            // Application ID of the Resource (could also be the Resource URI)

            string resource = "https://******.crm.dynamics.com/";

            AuthenticationContext ac = new AuthenticationContext(authority);
            AuthenticationResult result = null;
            var bearerToken = string.Empty;
            string ErrorMessege = string.Empty;
            try

            {
                //already having token
                result = await ac.AcquireTokenSilentAsync(resource, clientId);
                if (result != null)
                {
                    bearerToken = result.AccessToken;
                    log.LogInformation("Token Acquired:"+ bearerToken);
                }
            }

            catch (AdalException adalException)

            {//Acquire token
                if (adalException.ErrorCode == AdalError.FailedToAcquireTokenSilently

                || adalException.ErrorCode == AdalError.InteractionRequired)

                {

                    result = await ac.AcquireTokenAsync(resource, clientcred);
                    if (result != null)
                    {
                        bearerToken = result.AccessToken;
                        log.LogInformation("Token Acquired="+ bearerToken);

                    }
                }
                else
                {
                    log.LogWarning("Failed to acquire Bearer Token :-" + adalException.Message);
                    var AdalException = new { adalexception = "Failed to acquire Bearer Token :-" + adalException.Message };
                    return new BadRequestObjectResult(JsonConvert.SerializeObject(AdalException));
                    throw adalException;

                }

            }

            #endregion

            string responseMessage = string.IsNullOrEmpty(name)
                ? "This HTTP triggered function executed successfully. Pass a name in the query string or in the request body for a better response."
                : $"Hello, {name}. This HTTP triggered function executed successfully.";

            return new OkObjectResult(responseMessage);
        }
    }
}
The above function simply authenticates and write bearer to the log. Ensure you do not log this in your actual code.
In the next post, we will see how we can use this token to call D365 Web API from Azure Function App.
Hope this helps.

Recently, I received a strange requirement to show a dialogue to users as soon as they login to Dynamics 365. The dialogue can be an HTML page with company events or a video stream (exact requirement not mentioned here). The pop-up should be shown over dashboards as well as entity home grids. It is easy to show the dialogue on a record form as I can register JavaScript on the record form, or show an application-level notification using addGlobalNotification client API, if it was just a notification only. I was stuck on showing the dialogue on dashboards, as most model driven apps in D365 will land on some dashboard when the user logs-in, and we do not have any event triggers there. I shared the requirement with the community experts and finally Linn Zaw Win, Microsoft Business Application MVP, gave me a lead to try using the application ribbon buttons. Booom!!! It worked.

Here is what I tried.
Add a new button in the global tab.
Create a new solution and add application ribbon and one entity (any entity is fine) to the solution. Now open your solution using ribbon workbench. Select ApplicationRibbon in the entity dropdown as shown below.

Add a new button in the Global Tab by scrolling the Home area to the right until you find the Mscrm.GlobalTab. Drag a button and drop into Mscrm.GlobalTab.

Add enable rule for the button.
In the EnableRule, add a new step as CustomRule and select the JavaScript web resource in the library and enter the function name. Set default value as False so that button will be hidden (assuming your JavaScript function is not returning “True” value), you can also use display rules to keep the button always hidden.

Create a new Command and add the new enable rule we just created.

Now associate this command with the newly created button.

Publish your button
Once you have published, whenever a Dynamics 365 page is loaded, system will call your enable JavaScript. Below is the sample code I have used for showing a simple alert.
 function  showGlobalMessage()
	{
		 var alertStrings = { confirmButtonLabel: "Yes", text: "Go to Todays Video?", title: "Your Daily Message" };
var alertOptions = { height: 120, width: 260 };
Xrm.Navigation.openAlertDialog(alertStrings, alertOptions)
return false;
}
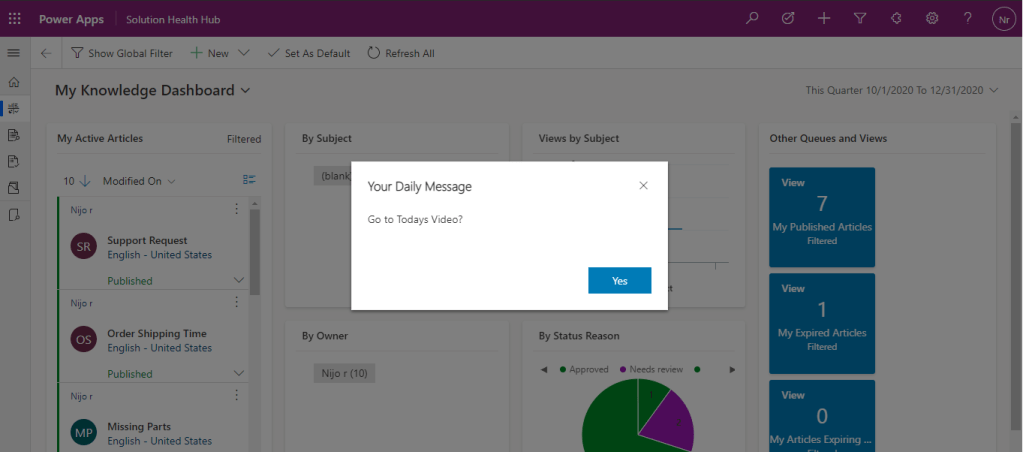
Note: As per the above logic, the dialogue shows (enable rule will be triggered) every time the user opens a new tab/window. To show the dialogue only once or with specific intervals, you can use a new custom entity to keep track of the notification setting for each user using Xrm.WebApi, or you can use localStorage (but using local storage may not be an officially supported D365 customization)
I know this is not a common scenario or ideal use case, but I hope it will save you some time when you come across strange requirements 🙂
Upgrade Yourself
Be it any profession, upgrading your skills is unquestionably significant. Not only does it open the door to new career opportunities, but it also helps you enhance the quality of your life. To keep myself technically updated, I have bookmarked a list of blogs and YouTube channels.. I also frequently check Feedspot’s Top 35 Microsoft Dynamics 365/CRM Blogs, which is regularly updated by the moderators. But is it enough?
For a Business Application Consultant , critical thinking is as important as software skills , and I must say that reading ‘Farnam Street’ enhances your decision-making skills. Shane Parrish who is an ex-spy, investor, and writer, improves your critical thinking ability with every post in his blog “Farnam Street”.
Why Farnam Street?
MR Shane focuses on the importance of cultivating mental models and frameworks to tackle complex issues. The blog ‘guides to decision making’ especially when you’re in a challenging situation. I must say that reading a 3-minute post on Farnam Street equals watching a week of TED or simialr videos. It simply means that you are served with the most appropriate information that you need to boost your decision-making skills regardless of your professional or skillset.
Shane Parrish urges visitors to ‘Upgrade Yourself’ and that’s one of the biggest reasons he is promoting self-betterment over classic self-help fare. He believes that being responsible to yourself is imperative and learning is one of the best investments that you can make in your life.

Here are some other ‘Be Better’ blogs that I would recommend:
For me, learning is like entering a world of opportunities. What about you?
When my colleagues are stuck on something, I always encourage them to do their best in Google search and then ask for help in the respective tech community, because good research is always important to nurture knowledge. But having said that, I always ensure that they check the Microsoft docs, if they haven’t, I suggest them to look into docs.microsoft.com.
Most developers start their career at the same pace and depend on random Google Searches. Even I started my career with a trust in blogs and communities. The blogs and videos are always helpful to make you understand the topics easily, but when you need deep technical knowledge, official documents or SDK documentation is the best source. These documents let you know the capabilities and limitations of the platform you work on.
Let’s take an example, if you are stuck at some point while using Power Apps Functions or D365APIs, what will you generally do? You might search it randomly and copy/paste the available piece of code (like we all do).
Can you imagine what can happen later to the system?
Is the code you copied supported by Microsoft?
Is it the optimal solution for your system and users?

SDK documentation is the answer to all these questions. It is your responsibility to ensure that you are not doing any unsupported customization.
We all know that the official documents are helpful but, do you know why people are not looking into these documents while working on something? It’s because we are all lazy…. These documents contain a broad range of technical information and are not as simple and easy to understand as individual blogs. But for technical knowledge and long-term future in D365 and Power Apps, it is advisable not to go with easy solutions. Reading through the official documents will definitely pay back your efforts. Once you start reading these documents and comprehend the topics, they become your true consultant.
In the start of our career, people may be short on time or lazy to check and read the SDK Documents. It wasn’t different for me either. But back in those days, I came across the blog of Ben Hosk and one of his statements struck me so hard “The CRM SDK can be stubborn, difficult, and renowned for not suffering fools gladly.” Reading this was the time when I decided to look into the Microsoft Documents along with the solutions from other Blogs and Videos available.

Now, referring the official documents for solution has more or less turned into a practice for me. If time does not permit to go through the documents, I would rather expand the deadline rather than compromise on the authenticity and quality of the solution. Moreover, I try to cover the topics during the weekend and learn something new from the official Microsoft Documents. So, if you are not familiar with these documents or fail to refer them even after knowing its benefits, it’s definitely a loss of opportunity to learn new things while at work.
So, you should never bypass “learning something new with every customization you do”!!!!
After adding Aggregate Grid Control to PCF gallery, I received many LinkedIn messages saying they love to build PCFs but they cannot as they are not pro UI developers. Trust me, I am not a pro UI developer just know the basics only :(, with the help of Awsome Microsoftcommunity, I managed to build a couple of PCF controls and for the last 6 months, every month am adding a new control to the PCF gallery. So now I have started a short video series of PCF control tutorial for beginners. these are 5 mins videos released once in every 3 days covering only one point per video. Hope this will be helpful for beginners. This is my first YouTube video series so am sure there is a huge scope for improvement 😅
