Tag: MicrosofyDynamics

Call JavaScript Methods Globally Over Dashboards, Home Grids, and Record Forms.

Recently, I received a strange requirement to show a dialogue to users as soon as they login to Dynamics 365. The dialogue can be an HTML page with company events or a video stream (exact requirement not mentioned here). The pop-up should be shown over dashboards as well as entity home grids. It is easy to show the dialogue on a record form as I can register JavaScript on the record form, or show an application-level notification using addGlobalNotification client API, if it was just a notification only. I was stuck on showing the dialogue on dashboards, as most model driven apps in D365 will land on some dashboard when the user logs-in, and we do not have any event triggers there. I shared the requirement with the community experts and finally Linn Zaw Win, Microsoft Business Application MVP, gave me a lead to try using the application ribbon buttons. Booom!!! It worked.

Photo by Andrea Piacquadio on Pexels.com

Here is what I tried.

  1. Added a hidden button in Global Tab (where the Advanced Find button is located) using Ribbon Workbench.
  2. Added JavaScript function using CustomRule of the button Enable Rule.
  3. Triggered dialogue by adding required logic inside my enable rule JavaScript.
  4. Since the global tab is there on all screens of the model driven app (including dashboard and grids), the button enable rule JavaScript method will be called and so is our dialogue logic.

Add a new button in the global tab.

Create a new solution and add application ribbon and one entity (any entity is fine) to the solution. Now open your solution using ribbon workbench. Select ApplicationRibbon in the entity dropdown as shown below.

Add a new button in the Global Tab by scrolling the Home area to the right until you find the Mscrm.GlobalTab. Drag a button and drop into  Mscrm.GlobalTab.

Add enable rule for the button.

In the EnableRule, add a new step as CustomRule and select the JavaScript web resource in the library and enter the function name. Set default value as False so that button will be hidden (assuming your JavaScript function is not returning “True” value), you can also use display rules to keep the button always hidden.

Create a new Command and add the new enable rule we just created.

Now associate this command with the newly created button.

Publish your button

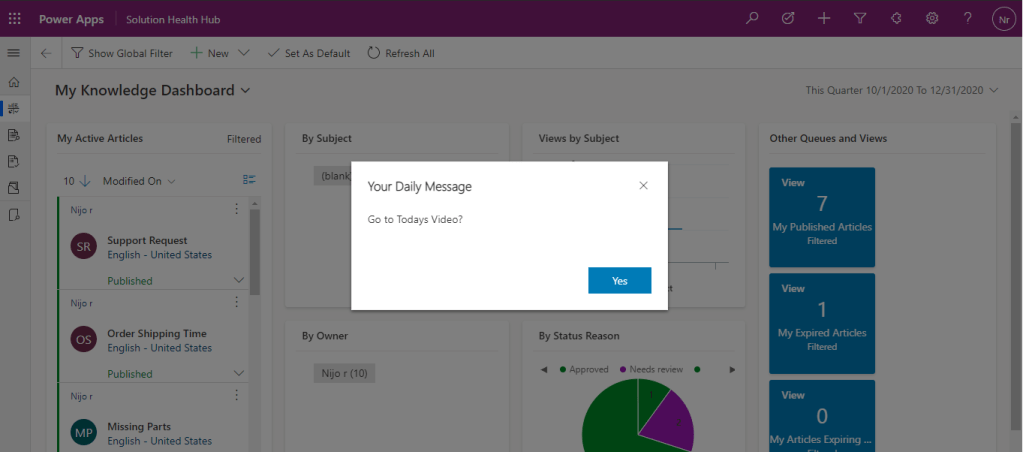
Once you have published, whenever a Dynamics 365 page is loaded, system will call your enable JavaScript. Below is the sample code I have used for showing a simple alert.

 function  showGlobalMessage()
	{
		 var alertStrings = { confirmButtonLabel: "Yes", text: "Go to Todays Video?", title: "Your Daily Message" };
var alertOptions = { height: 120, width: 260 };
Xrm.Navigation.openAlertDialog(alertStrings, alertOptions)
return false; 
}

Note: As per the above logic, the dialogue shows (enable rule will be triggered) every time the user opens a new tab/window. To show the dialogue only once or with specific intervals, you can use a new custom entity to keep track of the notification setting for each user using Xrm.WebApi, or you can use  localStorage (but using local storage may not be an officially supported D365 customization)

I know this is not a common scenario or ideal use case, but I hope it will save you some time when you come across strange requirements 🙂

Replacing Dialog in Model Driven Apps Part-1: Using Main Form Modal

Since the announcement of dialogue depreciation, I have been trying out different alternatives to replace dialog as I use them extensively in my projects. The first option I tried was using canvas apps as described in this post ,but I was not happy with that approach and tested other options and implemented those in my projects based on customer scenarios. I will be publishing these options as a series. This is the first post and let’s see how we can replace dialog with entity main form.

There are many gaps when we replace dialog with other alternatives, even though these gaps can be filled with workarounds, the maintainability is high when compared to a classic dialog. These issues can be handled to a great extend using main forms.

With the April 2020 preview release of the Unified Interface for model-driven apps in Power Apps you can now open a record in a dialog. The record will open in a modal dialog and users will have access to the command bar, header and tabs that you defined for the records main form.

We can us the above option replace classic dialog.

Scenario:

I have to request HR team to verify certain details about prospects, but HR team is not allowed to access contact details. I also need to capture feedback and remarks from HR team.

So I created an entity called “Requests(nj_dialoguebatchone)” , modified the main form as per my requirements and removed all the unwanted buttons using ribbon-workbench.

Next step is to call this form using JavaScript from contact form.

function loadDialogForm(executionContext) {

    formContext = executionContext.getFormContext();
    var pageInput = {
        pageType: "entityrecord",
        entityName: "nj_dialoguebatchone",
        formType:  2
// formType 2 opens a new record.
    };
    var navigationOptions = {
        target: 2,
        height: {value: 70, unit:"%"},
        width: {value: 35, unit:"%"},
        position: 1
//target: Number. Specify 2 to open the page in a dialog. 
//position:Number. Specify 1 to open the dialog in center.
    };
    Xrm.Navigation.navigateTo(pageInput, navigationOptions).then(
        function success(result) {
               
                // Handle dialog closed
        },
        function error() {
                // Handle errors
        }
    );


}

I hope the code is self explanatory, more details can be found in the following links.

Now you can bind this script with ribbon button or other form events Boom dialog is ready.

You can also use quick create forms, but main form gives you more flexibility in terms using business rule and other form level formatting and validations. You can also easily configure Workflows, FLOWS, or Plugins based on user input in this as record create and update events are available.

See the dialog in Action

P.S. Am a classic dialog fan 🙂

Aggregate Grid PCF

When you have to see the Sum, Count, AVG of numeric columns in a subgrid, what is the easiest way? Export to Excel right? Now, there is an easier way: Aggregate Grid PCF Control. View Aggregates directly from Subgrid. This PCF control will list all numeric and currency columns in the view at the footer area, you just have to select the required column. This is not a production-ready control(I wanted to give life to an idea that came in during COVID19 lockdown) you can get the source code and unmanaged solution from here.

CSS & Grid design is from hovering list By Danish Naglekar.

Smart Grid PCF

One of my customer complained during a UAT session that, it’s too difficult for her to add new record using + button in a sub-grid, as it takes her to a new record window and she has to perform too many navigation. She was happy, when I enabled the quick create forms.

But, I was not happy and I wondered why OOB editable grid is not supporting this. I thought to give it a try using PCF controls, and this is the result.

Initially, it was not easy as we need to query the metadata to get field type for each column in the view. Following are the steps to configure smartgrid.

  1. Get the solution from here
  2. Import solution
  3. Add control to sub-grid
  4. Give required parameters.
alt text
  • Primary Lookup: Logical name of the lookup field for the relationship. for example contact sub-grid in the account is “*parentcustomerid_account”.
  • Primary Entity Set: Entity set name of the current entity where the sub-grid is added

This is to set the related lookup using Web API, you can use Rest Builder to get these parameter values correctly, for example if contact sub-grid in account form is using parent customer relationship, to set the account lookup in contact following code is used var entity = {}; entity[“parentcustomerid_account@odata.bind“] = “/accounts(xxxxx-xxxx-xxxx)”;

Known bugs.

  • Does not support N:N
  • Validation for empty rows.
  • Does not support composite fields(customer lookup).
  • Poor CSS 🙂

Planned enhancements

  • Inline editing.
  • Validation for mandatory fields

This is not a perfect replacement for Quick create form, but you are always welcome to enhance and add features to Smart Grid Github Repo here.